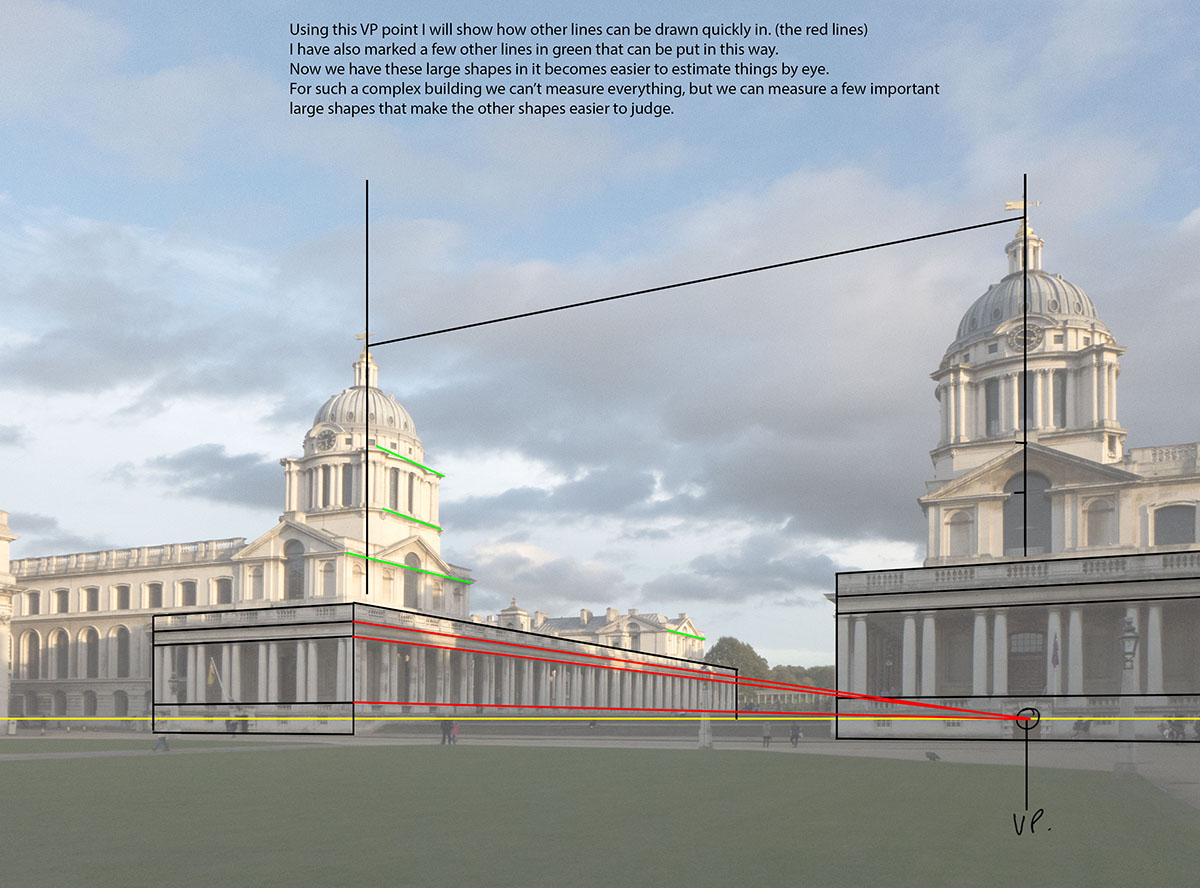
This is a very quick tutorial on how to draw out complex buildings with the minimum of measuring. All the images can be clicked for a larger version.
.
.

.
.
.
.
.
This is a very quick tutorial on how to draw out complex buildings with the minimum of measuring. All the images can be clicked for a larger version.
.
.
.
.
.
.
.
RSS feed for comments on this post.
Sorry, the comment form is closed at this time.
Powered by WordPress
Super tutorial Robb, more or less what I do.
Doug
Comment by Doug — October 23, 2013 @ 7:07 pm
Excellent Rob. Many people find the drawing bit hard and the painting easier. For me it’s the other way round! I find putting in diagonals to rectangles particularly useful when painting elevations at an oblique angle. Then you can position windows, doors etc. accurately in the centre of a gable end wall for example. Afraid I probably do too much by eye – probably comes from a father who could draw really well. He once told me that, while in an art lesson at secondary school in Newport IOW (probably about 14 years old), the art master leant over his shoulder and said “who taught you to draw Trask?” My father spluttered in reply ” wwwwell, you did Sir” to which the art master replied “Thank God I’ve achieved something in this life!”
Michael Trask P.S. Really enjoyed your recent blog on Artist Statements and how to wrap up a simple idea in gobbledegook!
Comment by Michael Trask — October 23, 2013 @ 7:09 pm
Thanks Michael, I do it by eye mostly… but only because I always used to measure until it became pretty much internalised. I think often people see experienced artists drawing it in as if by magic, but they don’t realise that that is just experience and they mostly used have to measure when they were learning.
Rob
Comment by Rob Adams — October 23, 2013 @ 8:16 pm
Another interesting and thought provoking piece, thanks Rob
Comment by Terry — October 23, 2013 @ 9:25 pm
First rate instruction.
Comment by Mick Carney — October 24, 2013 @ 9:36 am
A marvelous resource for those of us who are still learning, absolutely indispensable. This is going to make a real difference to my efforts. Thank you so much for sharing this Rob!
Comment by Kevin — October 24, 2013 @ 7:09 pm
Glad people find this useful, I will be doing some other methods in a while as there is more than one way of buttering this particular parsnip.
Rob
Comment by Rob Adams — October 24, 2013 @ 7:43 pm
I always take a photo of both the scene and my initial sketch using my phone when working outside. I have a phone app called sketchbook pro that cost about £1.50 to download. I use this to overlay a transparent version of the sketch on top of the photo to check if they match. It takes a few minutes to adjust the image sizes so they fit – the result is well worth the effort.
I look forward to your posts
All the best
Eamonn
Comment by Eamonn McCrory — October 24, 2013 @ 9:45 pm
Hi Eamonn, many would disapprove of this method but I am not necessarily one of them. But if you are doing this it seems a slightly long way round. If you take the photo lay a grid over it in Sketchbook Pro, grid your paper and you can just draw it out accurately from the phone image. Or indeed carry a drawing frame (a frame with a grid of threads) and proceed in the same manner. The disadvantage is that in the end we want to be able to assess a scene without any of these aids. To do that the brain has to be trained to check alignments up and down and diagonally, with practice this process occurs automatically without much conscious effort. Once this process is internalised, it makes life a lot easier!
Rob
Comment by Rob Adams — October 25, 2013 @ 9:51 am